
3.A.1 后端在解决什么问题
前端跑在使用者的浏览器里,使用者的电脑就是前端的地盘,代码、变量、计算过程,使用者只要打开浏览器的开发者工具,全部都看得到、改得动。
这件事的后果很直接:任何不能被使用者看到或篡改的东西,都不能只放在前端处理。密码、别人的资料、需要保密的商业逻辑,这些得放在一个使用者摸不到的地方处理,这个地方就是后端,实际上是另一台电脑,叫服务器(server)。
一个很具体的例子:如果一张订单的总价是在前端算好、再送给后端存起来,使用者只要打开开发者工具,把送出去的总价改成 0.01,后端如果直接相信这个数字,就等于让使用者自己决定要付多少钱。真正安全的做法,是后端拿到订单内容后,自己重新算一次总价,不相信前端送来的计算结果。这个概念很重要,动手练习会具体拆一次。
3.A.2 服务器怎么运作:请求与响应
前端和后端之间的沟通,靠的是不断来回的请求(request)和响应(response)。
用点餐 App 的例子:使用者按下"送出订单",前端把订单内容包成一个请求,送到后端。后端收到请求,处理完,包成一个响应,送回前端。前端拿到响应,把结果显示给使用者看。上面那张图画的就是请求进到后端之后,内部实际会经过的几个阶段。
这个"请求进来 → 处理 → 响应回去"的模式,几乎是所有后端代码的骨架。之后看到任何一段后端代码,先问自己:这段在处理请求的哪个阶段?
3.A.3 HTTP 方法与状态码
请求要告诉后端"我想做什么",靠的是 HTTP 方法:
- GET:要资料,比如"给我看菜单"
- POST:送资料、通常用来新增东西,比如"这是我的订单,帮我建一笔"
- PUT 或 PATCH:改资料,比如"把这笔订单的地址改一下"
- DELETE:删资料,比如"取消这笔订单"
响应要告诉前端"结果怎么样",靠的是状态码:
- 200:成功
- 400:前端送来的请求格式有问题
- 401 / 403:没有登入、或者没有权限做这件事
- 404:找不到这个东西
- 500:后端自己出错了,不是前端的问题
审查 AI 生成的后端代码时,方法和状态码用得对不对,是很快能看出代码品质的地方。用 GET 却在里面改数据库的资料,或者所有情况都回 200(连出错的时候也回 200),都是常见的问题。
3.A.4 一个最小的后端范例
延续点餐 App 的例子,用 Node.js 风格的写法示范一个处理订单的路由:
app.post('/api/orders', function(req, res) {
  const items = req.body.items;
  const total = calculateTotal(items);
  saveOrderToDatabase(items, total);
  res.status(200).json({ message: '订单已收到', total: total });
});
逐行看:
app.post('/api/orders', ...):这是一个路由,专门处理送到/api/orders这个路径的 POST 请求req.body.items:req是请求,req.body是前端送来的资料内容,这里读出订单里的商品清单calculateTotal(items):后端自己根据商品清单重新计算总价,不是直接用前端送来的数字saveOrderToDatabase(items, total):把订单写进数据库res.status(200).json({...}):res是响应,送回状态码 200 和一段 JSON 格式的资料
这段代码走的就是上面那张图的五个阶段:请求进来、路由比对、商业逻辑(重新计算)、写入数据库、送回响应。
AI 给了你另一个版本的订单处理路由:
app.post('/api/orders', function(req, res) {
  const items = req.body.items;
  const total = req.body.total;
  saveOrderToDatabase(items, total);
  res.status(200).json({ message: '订单已收到' });
});
给自己 1 分钟,跟上面那段对照着看,找出差异在哪,想想这个差异会造成什么后果,再往下看答案。
看答案
答案:问题出在 const total = req.body.total。
这段代码直接相信前端送来的总价,没有自己重新计算一次。使用者只要打开浏览器的开发者工具,把送出去的 total 改成任意数字,比如 0.01,后端会照单全收,直接存进数据库,等于使用者可以自己决定要付多少钱。
这正是 3.A.1 讲的那个问题,只是这次是具体的代码。正确写法要把 req.body.total 改回 calculateTotal(items),后端永远要根据实际的商品内容自己算一次,不能相信前端算好送来的数字。
这类"信任前端计算结果"的问题,在 AI 生成的后端代码里很常见,因为从功能上看,两个版本都"能跑",差异只在安全性上,不细看很容易漏掉。
延伸资源
- MDN: Overview of HTTP — 对应 3.A.2、3.A.3,把请求和响应的完整格式讲清楚
- MDN: HTTP response status codes — 对应 3.A.3,查任何状态码的意思都可以来这里
3.A.1 What The Backend Solves
The frontend runs in the user's browser. The user's computer is the frontend's turf, and the code, variables and calculations are all visible and editable the moment the user opens the browser's developer tools.
The consequence is direct: anything that must not be seen or tampered with by the user cannot be handled on the frontend alone. Passwords, other people's data, business logic that needs to stay private, all of this has to be handled somewhere the user cannot reach. That place is the backend, which is really another computer called a server.
A concrete example: if an order's total is calculated on the frontend and then sent to the backend to store, the user only has to open developer tools and change the total being sent to 0.01. If the backend simply trusts that number, it lets the user decide how much to pay. The safe way is for the backend to recalculate the total itself once it has the order, never trusting the figure the frontend sends. This idea matters, and the exercise unpacks it.
3.A.2 How A Server Works: Request And Response
The frontend and backend communicate through a constant back-and-forth of requests and responses.
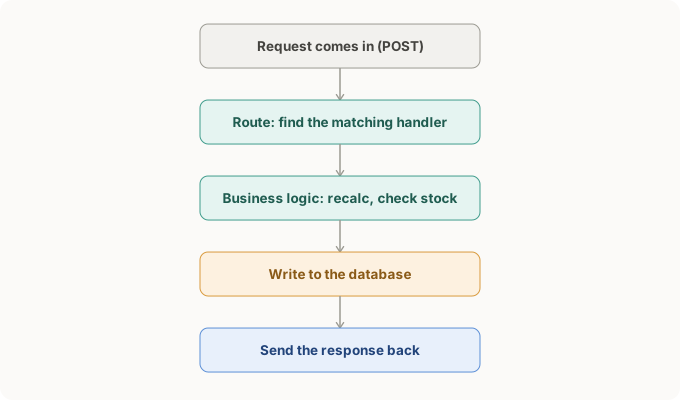
Using the food-ordering app: the user taps "Place order", the frontend wraps the order into a request and sends it to the backend. The backend receives the request, processes it, wraps the result into a response, and sends it back. The frontend takes the response and shows the result to the user. The diagram above shows the stages a request actually goes through once it reaches the backend.
This "request comes in, process, response goes back" pattern is the skeleton of almost all backend code. Whenever you see a piece of backend code, first ask yourself: which stage of the request is this handling?
3.A.3 HTTP Methods And Status Codes
A request tells the backend "what I want to do" through an HTTP method:
- GET: ask for data, like "show me the menu".
- POST: send data, usually to create something, like "here is my order, create one".
- PUT or PATCH: change data, like "update the address on this order".
- DELETE: remove data, like "cancel this order".
A response tells the frontend "how it went" through a status code:
- 200: success.
- 400: the request from the frontend is malformed.
- 401 / 403: not logged in, or not allowed to do this.
- 404: this thing cannot be found.
- 500: the backend itself errored, not the frontend's fault.
When you review AI-generated backend code, whether methods and status codes are used correctly is a quick read on quality. Using GET while changing data in the database, or returning 200 for everything (even for errors), are both common problems.
3.A.4 A Minimal Backend Example
Continuing the food-ordering app, here is a Node.js-style route that handles an order:
app.post('/api/orders', function(req, res) {
  const items = req.body.items;
  const total = calculateTotal(items);
  saveOrderToDatabase(items, total);
  res.status(200).json({ message: '订单已收到', total: total });
});
Line by line:
app.post('/api/orders', ...): a route that handles POST requests sent to the/api/orderspath.req.body.items:reqis the request,req.bodyis the data the frontend sent, and here it reads the list of items in the order.calculateTotal(items): the backend recalculates the total from the item list itself, rather than using the number the frontend sent.saveOrderToDatabase(items, total): writes the order into the database.res.status(200).json({...}):resis the response, sending back status 200 and some JSON data.
This code walks through the five stages in the diagram above: request comes in, route match, business logic (recalculating), write to database, send the response back.
AI gave you another version of the order route:
app.post('/api/orders', function(req, res) {
  const items = req.body.items;
  const total = req.body.total;
  saveOrderToDatabase(items, total);
  res.status(200).json({ message: '订单已收到' });
});
Give yourself 1 minute. Compare it to the version above, find the difference, and think about what it leads to, then read the answer.
看答案
Answer: the problem is const total = req.body.total.
This code simply trusts the total the frontend sent, without recalculating. The user only has to open developer tools and change the total being sent to any number, say 0.01, and the backend takes it as is and writes it straight to the database. The user gets to decide how much to pay.
This is exactly the problem from 3.A.1, now in actual code. The fix is to change req.body.total back to calculateTotal(items). The backend must always recalculate from the real item contents, never trusting a figure the frontend worked out and sent.
This "trust the frontend's calculation" problem is very common in AI-generated backend code, because functionally both versions run. The difference is only in security, which is easy to miss unless you look closely.
延伸资源
- MDN: Overview of HTTP — for 3.A.2 and 3.A.3, the full format of requests and responses
- MDN: HTTP response status codes — for 3.A.3, look up what any status code means
3.B.1 API 是什么
API(Application Programming Interface)是后端给前端的一份说明书:告诉前端有哪些功能可以用、每个功能要送什么资料过去、会收到什么资料回来。
前端工程师不需要知道后端内部怎么查数据库、怎么算总价,只要照着这份说明书丢资料、收资料就行。这个分工也是为什么前端和后端可以分开开发:只要 API 的规格谈好了,两边各自实现自己的部分,最后接得起来。
3.B.2 REST:一种设计 API 网址的风格
REST 是设计 API 时最常见的一种风格,核心想法是:把系统里的东西都当成"资源",每个资源有自己的网址,用 HTTP 方法表示要对这个资源做什么动作。
拿点餐 App 举例:
| 想做的事 | HTTP 方法 | 网址 |
|---|---|---|
| 拿菜单 | GET | /api/menu |
| 拿编号 123 的订单 | GET | /api/orders/123 |
| 新增一笔订单 | POST | /api/orders |
| 更新编号 123 的订单 | PUT | /api/orders/123 |
| 取消编号 123 的订单 | DELETE | /api/orders/123 |
规律是:网址只描述"是哪个资源"(orders、orders/123),动作交给 HTTP 方法去表达,网址里不会出现动词。
3.B.3 常见的坑:把动词塞进网址、用错方法
AI 生成的 API 设计,很容易写成这样:
GET /api/getAllOrders
POST /api/createOrder
POST /api/deleteOrder/123
网址里出现了 get、create、delete 这些动词,跟 HTTP 方法本身要表达的意思重复了。改成 REST 风格:
GET /api/orders
POST /api/orders
DELETE /api/orders/123
另一个更严重的坑,是用 GET 方法去执行会改变资料的动作,比如:
GET /api/deleteOrder?id=123
GET 按照 HTTP 的设计原意,应该是"安全"的,意思是执行 GET 不该改变服务器上的任何资料,只是单纯查询。这不是一个可有可无的细节,是有真实事故的:2005 年 Google 推出一款叫 Web Accelerator 的浏览器加速工具,会自动预先载入网页上所有的连结来加快浏览速度。当时有些网站把"删除"这类操作做成一般的连结、用 GET 方法处理,Web Accelerator 不知道这些连结背后是删除动作,照样预先载入,结果不少用户的资料被意外删光。事后 Ruby on Rails 这类框架特地加了防护,避免开发者不小心把破坏性操作绑在 GET 请求上。
审查 AI 生成的 API 时,看到 GET 方法后面接着"删除"、"更新"这类字眼,要特别留意。
3.B.4 请求与响应的资料格式:JSON
前后端之间传的资料,最常见的格式是 JSON(JavaScript Object Notation)。一笔订单的 JSON 大概长这样:
{
  "orderId": 123,
  "items": [
    { "name": "炒饭", "price": 8, "quantity": 2 },
    { "name": "奶茶", "price": 4, "quantity": 1 }
  ],
  "total": 20,
  "status": "confirmed"
}
几个基本规则:
- 资料用
"key": value的方式配对,key 一定要用双引号包起来 - 值可以是字串(
"confirmed")、数字(20)、阵列(items那个方括号包起来的清单)、或者另一个物件(items阵列里每一笔都是一个花括号包起来的物件) - 阵列和物件可以互相嵌套,像这里
items是一个阵列,里面每个元素又是一个物件
这份 JSON 就是 Module 2.C 讲过的 req.body,前端把它包好送过去,后端用 req.body.items、req.body.total 这样的写法把里面的资料一个一个读出来。
AI 帮你的点餐 App 设计了这一组 API:
GET  /api/getMenu
GET  /api/getOrder?id=123
POST /api/newOrder
GET  /api/cancelOrder?id=123
给自己 2 分钟,对照 3.B.2、3.B.3 讲的规则,找出这组设计里的问题,再往下看答案。
看答案
答案:两个问题。
第一,网址里塞了动词:getMenu、getOrder、newOrder、cancelOrder,跟 REST 风格不符,应该让网址只描述资源,动作交给 HTTP 方法。
第二,也是更严重的:GET /api/cancelOrder?id=123 用 GET 方法执行了"取消订单"这个会改变资料的动作。这正是 3.B.3 提到的那类问题,取消订单这种操作应该用 DELETE,不该用 GET。
改成 REST 风格之后:
GET    /api/menu
GET    /api/orders/123
POST   /api/orders
DELETE /api/orders/123
延伸资源
- MDN: Overview of HTTP — 对应 3.B.2、3.B.3,HTTP 方法的完整定义和语意
- Wikipedia: Google Web Accelerator — 对应 3.B.3 提到的真实事故,可以看完整经过
3.B.1 What An API Is
An API (Application Programming Interface) is the backend's instruction sheet for the frontend: it says which features are available, what data to send for each, and what data comes back.
A frontend engineer does not need to know how the backend queries the database or works out the total. They just send and receive data according to this sheet. This division is also why frontend and backend can be built separately: once the API spec is agreed, each side implements its own part and they connect at the end.
3.B.2 REST: A Style For Designing API URLs
REST is the most common style for designing an API. The core idea: treat everything in the system as a "resource", give each resource its own URL, and use the HTTP method to say what action to take on it.
Using the food-ordering app:
| What you want to do | HTTP method | URL |
|---|---|---|
| Get the menu | GET | /api/menu |
| Get order number 123 | GET | /api/orders/123 |
| Create an order | POST | /api/orders |
| Update order number 123 | PUT | /api/orders/123 |
| Cancel order number 123 | DELETE | /api/orders/123 |
The rule: the URL only describes which resource it is (orders, orders/123), the action is expressed by the HTTP method, and no verb appears in the URL.
3.B.3 Common Traps: Verbs In The URL, Wrong Method
AI-generated API design easily comes out like this:
GET /api/getAllOrders
POST /api/createOrder
POST /api/deleteOrder/123
The URLs contain verbs like get, create and delete, repeating what the HTTP method already says. In REST style:
GET /api/orders
POST /api/orders
DELETE /api/orders/123
A more serious trap is using GET to perform an action that changes data, like:
GET /api/deleteOrder?id=123
By HTTP's original design, GET is meant to be "safe", meaning a GET should not change any data on the server, only query it. This is not an optional detail, and there is a real incident behind it. In 2005 Google launched a browser speed-up tool called Web Accelerator that automatically pre-loaded all the links on a page to make browsing faster. Some sites at the time had made "delete" actions into plain links handled with GET. Web Accelerator did not know these links were delete actions and pre-loaded them anyway, and a good number of users had their data wiped by accident. Afterwards, frameworks like Ruby on Rails added protection so developers would not accidentally tie a destructive action to a GET request.
When you review an AI-generated API, watch closely when a GET method is followed by words like "delete" or "update".
3.B.4 The Data Format For Requests And Responses: JSON
The most common format for data passed between frontend and backend is JSON (JavaScript Object Notation). One order in JSON looks roughly like this:
{
  "orderId": 123,
  "items": [
    { "name": "炒饭", "price": 8, "quantity": 2 },
    { "name": "奶茶", "price": 4, "quantity": 1 }
  ],
  "total": 20,
  "status": "confirmed"
}
A few basic rules:
- Data is paired as
"key": value, and the key must be wrapped in double quotes. - A value can be a string (
"confirmed"), a number (20), an array (the list wrapped in square brackets underitems), or another object (each entry in theitemsarray is an object wrapped in braces). - Arrays and objects can nest inside each other, as here where
itemsis an array and each element is an object.
This JSON is the req.body from Module 2.C. The frontend wraps it up and sends it, and the backend reads the pieces out with code like req.body.items and req.body.total.
AI designed this set of APIs for your food-ordering app:
GET  /api/getMenu
GET  /api/getOrder?id=123
POST /api/newOrder
GET  /api/cancelOrder?id=123
Give yourself 2 minutes. Against the rules in 3.B.2 and 3.B.3, find the problems, then read the answer.
看答案
Answer: two problems.
First, the URLs contain verbs: getMenu, getOrder, newOrder, cancelOrder. This does not fit REST style, where the URL should only describe the resource and the action goes to the HTTP method.
Second, and more serious: GET /api/cancelOrder?id=123 uses GET to perform "cancel order", an action that changes data. This is exactly the problem from 3.B.3. Canceling an order should use DELETE, not GET.
In REST style:
GET    /api/menu
GET    /api/orders/123
POST   /api/orders
DELETE /api/orders/123
延伸资源
- MDN: Overview of HTTP — for 3.B.2 and 3.B.3, the full definition and meaning of HTTP methods
- Wikipedia: Google Web Accelerator — for the real incident in 3.B.3, the full story
3.C.1 数据库在解决什么问题
后端处理请求时,资料通常先放在内存里。内存的问题是,程序一重启、服务器一关机,里面的东西就没了。
点餐 App 如果没有数据库,服务器重启一次,所有订单纪录就全部消失。数据库负责把资料永久存下来,不管程序重启几次,资料都还在。这是数据库存在的核心理由:持久化(persistence)。
3.C.2 关系型 vs 非关系型数据库
数据库大致分两类:
- 关系型(PostgreSQL、MySQL):资料按表格存,很像 Excel,每张表格有固定的栏位,表格跟表格之间可以透过"关联"互相参照。
- 非关系型(MongoDB、Redis):资料存法比较自由,不用每一笔都长得一模一样,适合结构常常变动的资料。
多数需要清楚记录"谁跟谁有关系"的系统,比如订单系统、会员系统,会选关系型数据库,因为关联查询是它的强项。这份教材接下来聚焦关系型数据库。
3.C.3 表格、栏位、主键、外键
上面那张图是点餐 App 数据库设计的一部分:一张 orders 表存订单本身,一张 order_items 表存每笔订单里的品项。
几个关键概念:
- 主键(Primary Key,图上标 PK):每一行资料的唯一识别码,
orders表的id、order_items表的id,都是各自表格里独一无二的编号。 - 外键(Foreign Key,图上标 FK):
order_items表里的order_id,指向orders表的id,用来表示"这个品项属于哪一笔订单"。这就是关系型数据库"关系"两个字的来源,靠外键把不同表格的资料关联起来。 - 一笔订单可以有多个品项,这种"一对多"的关系,图上用
||--o{表示。
为什么不把品项直接塞进 orders 表格里的一个栏位?因为一笔订单可能有 1 个品项,也可能有 10 个,表格的栏位数量是固定的,没办法弹性容纳数量不固定的东西。拆成两张表、用外键关联,才能处理这种"一对多"的情况。
3.C.4 SQL 基础语法
操作关系型数据库用的语言叫 SQL,四个最基本的动作:
-- 查询
SELECT * FROM orders WHERE id = 123;

-- 新增
INSERT INTO orders (status, total) VALUES ('pending', 20);

-- 更新
UPDATE orders SET status = 'confirmed' WHERE id = 123;

-- 删除
DELETE FROM orders WHERE id = 123;
这四个动作,其实就是 Module 3.A 讲过的 GET / POST / PUT / DELETE 在数据库层的对应版本。一个 API 端点收到请求后,往往就是把请求翻译成一句对应的 SQL,去问数据库要资料或改资料。
AI 给了你这段查询订单的后端代码:
app.get('/api/orders', function(req, res) {
  const status = req.query.status;
  const query = "SELECT * FROM orders WHERE status = '" + status + "'";
  db.execute(query, function(err, results) {
    res.json(results);
  });
});
给自己 2 分钟,想想如果有人把 status 传成一段刻意设计过的字串,可能会发生什么事,再往下看答案。
看答案
答案:这段代码有 SQL 注入(SQL Injection)漏洞。
问题出在 "SELECT * FROM orders WHERE status = '" + status + "'" 这一行,直接把使用者传进来的 status 用字串拼接的方式塞进 SQL 语句里,完全没有做任何处理。
如果有人把 status 传成:
'; DROP TABLE orders; --
拼出来的 SQL 会变成:
SELECT * FROM orders WHERE status = ''; DROP TABLE orders; --'
这句话会先执行一个查不到东西的空查询,接着执行 DROP TABLE orders,把整张 orders 表格删掉,最后的 -- 把原本查询剩下的部分注释掉,让整句话在语法上合法。整张表可能就这样被删光。
这不是罕见的边缘案例,SQL 注入是网络资安领域最经典、最常被列为头号风险的攻击手法之一,因为字串拼接 SQL 这种写法太容易不小心写出来了。
正确做法是用参数化查询(parameterized query),把使用者输入的值当成参数传给数据库函式库,不要自己手动拼字串:
const query = "SELECT * FROM orders WHERE status = ?";
db.execute(query, [status], function(err, results) {
  res.json(results);
});
用 ? 当占位符,数据库函式库会自动确保 status 这个值只被当成资料看待,就算里面藏着 DROP TABLE 这种字眼,也不会被解读成一句要执行的 SQL 指令。审查 AI 生成的后端代码时,只要看到用 + 号或字串模板把使用者输入直接拼进 SQL 语句,就要停下来检查。
延伸资源
- OWASP: SQL Injection — 对应动手练习,SQL 注入攻击的完整原理说明
- OWASP: SQL Injection Prevention Cheat Sheet — 各种语言的参数化查询写法对照
3.C.1 What A Database Solves
When the backend processes a request, the data usually sits in memory first. The trouble with memory is that the moment the program restarts or the server shuts down, everything in it is gone.
Without a database, one server restart and every order record in the food-ordering app disappears. A database stores data permanently, so no matter how many times the program restarts, the data is still there. This is the core reason a database exists: persistence.
3.C.2 Relational Vs Non-relational Databases
Databases split roughly into two types:
- Relational (PostgreSQL, MySQL): data is stored in tables, much like Excel. Each table has fixed columns, and tables can reference each other through "relationships".
- Non-relational (MongoDB, Redis): data is stored more freely, without every record looking identical, which suits data whose shape changes often.
Most systems that need to record clearly "who relates to whom", like an order system or a membership system, choose a relational database, because relational queries are its strength. This course focuses on relational databases from here.
3.C.3 Tables, Columns, Primary Keys, Foreign Keys
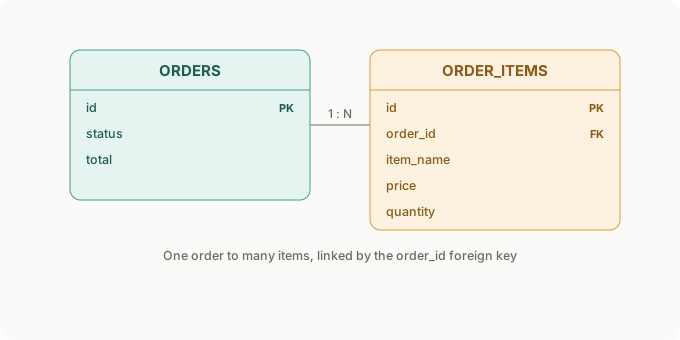
The diagram above is part of the food-ordering app's database design: an orders table stores the orders themselves, and an order_items table stores the items in each order.
A few key ideas:
- Primary key (marked PK): the unique identifier for each row. The
idin theorderstable and theidin theorder_itemstable are each a unique number within their own table. - Foreign key (marked FK): the
order_idin theorder_itemstable points to theidin theorderstable, to say "which order this item belongs to". This is where the word "relational" comes from: foreign keys tie data across tables together. - One order can have many items. This "one to many" relationship is shown on the diagram as
||--o{.
Why not just stuff the items into one column of the orders table? Because an order might have 1 item or 10, and a table's number of columns is fixed, so it cannot flexibly hold a variable number of things. Splitting into two tables linked by a foreign key is what handles this "one to many" case.
3.C.4 Basic SQL Syntax
The language for working with a relational database is SQL. The four most basic actions:
-- 查询
SELECT * FROM orders WHERE id = 123;

-- 新增
INSERT INTO orders (status, total) VALUES ('pending', 20);

-- 更新
UPDATE orders SET status = 'confirmed' WHERE id = 123;

-- 删除
DELETE FROM orders WHERE id = 123;
These four actions are the database-layer version of the GET / POST / PUT / DELETE from Module 3.A. Once an API endpoint receives a request, it often just translates the request into one matching SQL statement to ask the database for data or to change it.
AI gave you this backend code that queries orders:
app.get('/api/orders', function(req, res) {
  const status = req.query.status;
  const query = "SELECT * FROM orders WHERE status = '" + status + "'";
  db.execute(query, function(err, results) {
    res.json(results);
  });
});
Give yourself 2 minutes. Think about what could happen if someone passes a carefully crafted string as status, then read the answer.
看答案
Answer: this code has a SQL injection hole.
The problem is the line "SELECT * FROM orders WHERE status = '" + status + "'", which joins the user-supplied status straight into the SQL statement as a string, with no handling at all.
If someone passes status as:
'; DROP TABLE orders; --
the joined SQL becomes:
SELECT * FROM orders WHERE status = ''; DROP TABLE orders; --'
This first runs an empty query that finds nothing, then runs DROP TABLE orders, deleting the whole orders table, and the final -- comments out the rest of the original query so the whole thing is still valid syntax. The entire table can be wiped out this way.
This is not a rare edge case. SQL injection is one of the most classic attacks in web security and is regularly listed as a top risk, because joining SQL as a string is so easy to write by accident.
The right way is a parameterized query, passing the user's input to the database library as a parameter instead of joining strings by hand:
const query = "SELECT * FROM orders WHERE status = ?";
db.execute(query, [status], function(err, results) {
  res.json(results);
});
With ? as a placeholder, the database library makes sure the status value is only ever treated as data, so even if it hides words like DROP TABLE, they are not read as a SQL command to run. When you review AI-generated backend code, whenever you see user input joined straight into a SQL statement with a + or a string template, stop and check.
延伸资源
- OWASP: SQL Injection — for the exercise, the full mechanics of a SQL injection attack
- OWASP: SQL Injection Prevention Cheat Sheet — parameterized query patterns across languages
3.D.1 认证 vs 授权:两个常被搞混的词
- 认证(Authentication):你是谁。使用者输入帐号密码、系统确认"这真的是本人",就是认证。
- 授权(Authorization):你能做什么。认证通过之后,系统还要知道这个人是一般会员还是管理员,能看哪些东西、能做哪些操作,这是授权。
顺序永远是先认证、再授权。一个常见的 bug 是只做了认证、忘了授权:系统确认了"这是本人",却没检查"这个人有没有权限做这件事",结果任何登入过的使用者,不管身份是什么,都能操作管理员才能碰的功能。
3.D.2 密码怎么存
密码绝对不能在数据库里明文存放。原因很直接:数据库一旦外泄,明文密码等于直接送给攻击者,而且很多人习惯在不同网站用同一组密码,一次外泄可能连带影响使用者在其他网站的帐号。
正确做法是用哈希(hashing):把密码丢进一个单向函式,得到一串看起来像乱码的字串,存进数据库的是这串乱码,不是原始密码。单向的意思是,就算拿到这串乱码,也没有办法反推回原本的密码。
光哈希还不够,还要加盐(salt):给每个密码搭配一个随机产生的值一起做哈希,确保两个使用者就算用了完全一样的密码,存进数据库的哈希值也会不一样。这可以防止攻击者预先算好一份"常见密码对应的哈希值"清单(叫彩虹表),拿去对照数据库直接破解。
实务上不用自己手刻这套逻辑,用现成的函式库,最常见的是 bcrypt:
const bcrypt = require('bcrypt');

// 注册时,把密码哈希过再存
const hashedPassword = await bcrypt.hash(password, 10);
db.createUser(username, hashedPassword);
bcrypt 会自动处理加盐,10 是运算强度,数字越大越难被暴力破解,但也越慢。
3.D.3 Session 与 Token:服务器怎么"记得"你是谁
HTTP 本身是无状态的(stateless),意思是每一次请求都是独立的,服务器预设不会记得上一次请求是谁发的。使用者登入后,接下来的每个请求,都得有办法证明"这还是刚才登入的那个人"。
常见的两种解法:
- Session:登入成功后,后端在自己这边存一份"这个人已登入"的纪录,给使用者一个 cookie 当身份凭证,之后每次请求,浏览器自动带上这个 cookie,后端拿它去对照存在自己这边的纪录。
- Token(常见的实作叫 JWT):登入成功后,后端把身份资讯包进一段加密过的字串,直接给使用者保管,不在自己这边存纪录。之后每次请求,使用者主动带着这段字串来证明身份,后端只要能验证这段字串没被篡改,就相信它。
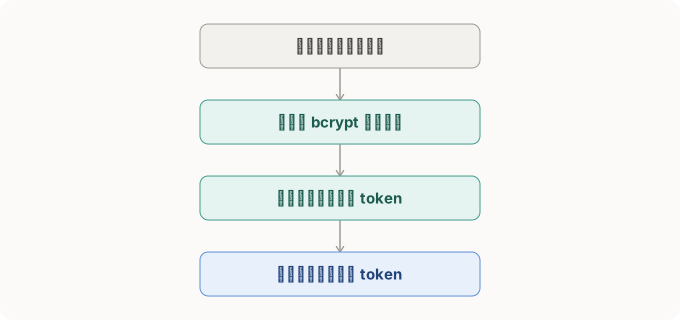
上面那张图画的是 token 的版本。两种方式各有取舍,但核心概念一样:登入这个动作,换来一个之后能反复用来证明身份的凭证。
3.D.4 到目前为止看过的资安问题,串起来看一次
这门课到这里,陆续看过好几个资安相关的问题,串起来看会更清楚它们其实是同一个态度的不同表现:不相信来自外部的任何东西,该做的检查一步都不能省。
- 密钥写死在代码里,而不是放进环境变量
- 后端直接信任前端送来的总价,而不是自己重新计算
- 用 GET 方法执行会改变资料的删除动作
- 用字串拼接组 SQL,而不是用参数化查询
- 密码明文存进数据库,而不是哈希过再存
审查 AI 生成的代码时,这五点可以当一份简单的检查清单来用。
AI 给了你这段登入功能的代码:
app.post('/api/login', function(req, res) {
  const { username, password } = req.body;
  const user = db.findUser(username);
  if (user.password === password) {
    res.json({ message: '登入成功' });
  } else {
    res.status(401).json({ message: '密码错误' });
  }
});
给自己 1 分钟,想想这段代码在密码处理上有什么问题,再往下看答案。
看答案
答案:user.password === password 这一行直接拿数据库里的 user.password 跟使用者输入的明文密码做字串比对。能这样比对,代表数据库里存的 user.password 本身就是明文密码,没有经过哈希。
正确写法要搭配 3.D.2 讲的 bcrypt:
const bcrypt = require('bcrypt');

app.post('/api/login', async function(req, res) {
  const { username, password } = req.body;
  const user = db.findUser(username);
  const match = await bcrypt.compare(password, user.password);
  if (match) {
    res.json({ message: '登入成功' });
  } else {
    res.status(401).json({ message: '密码错误' });
  }
});
bcrypt.compare 会把使用者输入的明文密码用同样的方式哈希一次,再跟数据库里存的哈希值比对,两者对得上就代表密码正确,全程不需要数据库里存在任何明文密码。
延伸资源
- OWASP: Password Storage Cheat Sheet — 对应 3.D.2,密码哈希的完整规范和各种算法比较
3.D.1 Authentication Vs Authorization: Two Words Often Mixed Up
- Authentication: who you are. The user enters a username and password and the system confirms "this really is the person", that is authentication.
- Authorization: what you can do. After authentication passes, the system still needs to know whether this person is a regular member or an admin, what they can see and what they can do. That is authorization.
The order is always authenticate first, then authorize. A common bug is doing only authentication and forgetting authorization: the system confirms "this is the person" but never checks "does this person have permission to do this", so any logged-in user, whatever their role, can use features only an admin should touch.
3.D.2 How Passwords Are Stored
Passwords must never be stored in the database as plain text. The reason is direct: once the database leaks, plain-text passwords go straight to the attacker, and since many people reuse one password across sites, a single leak can affect the user's accounts elsewhere too.
The right way is hashing: run the password through a one-way function to get a string that looks like gibberish, and store that gibberish in the database, not the original password. One-way means that even with the gibberish, there is no way to work back to the original password.
Hashing alone is not enough; you also add salt: hash each password together with a randomly generated value, so that even two users with the exact same password end up with different hashes in the database. This stops an attacker from pre-computing a list of "common passwords and their hashes" (called a rainbow table) and matching it against the database to crack it directly.
In practice you do not hand-roll this logic. You use a ready-made library, most commonly bcrypt:
const bcrypt = require('bcrypt');

// 注册时,把密码哈希过再存
const hashedPassword = await bcrypt.hash(password, 10);
db.createUser(username, hashedPassword);
bcrypt handles salting automatically. The 10 is the work factor: a bigger number is harder to brute-force but also slower.
3.D.3 Session And Token: How The Server "Remembers" Who You Are
HTTP itself is stateless, meaning every request is independent and the server does not remember by default who sent the previous one. After a user logs in, every request that follows needs a way to prove "this is still the person who just logged in".
Two common solutions:
- Session: after a successful login, the backend keeps a record on its own side that "this person is logged in", and gives the user a cookie as their identity token. On each later request the browser sends the cookie automatically, and the backend matches it against the record it holds.
- Token (a common implementation is JWT): after a successful login, the backend packs the identity info into an encrypted string and hands it to the user to keep, storing no record on its own side. On each later request the user brings the string to prove their identity, and as long as the backend can verify the string has not been tampered with, it trusts it.
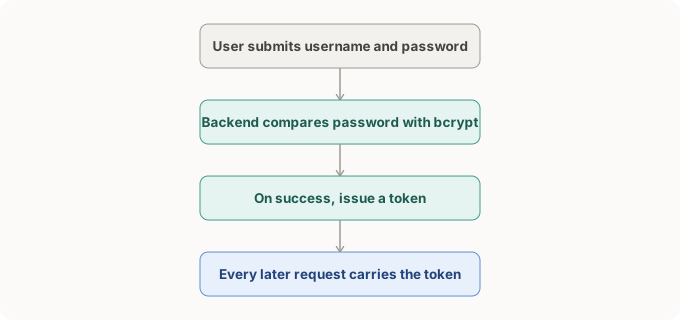
The diagram above shows the token version. The two approaches each have trade-offs, but the core idea is the same: the act of logging in earns you a token you can reuse to prove your identity again and again.
3.D.4 The Security Problems So Far, Seen Together
By this point the course has walked through several security problems, and seeing them together makes it clearer they are the same attitude in different forms: trust nothing that comes from outside, and skip none of the checks you should do.
- A key hard-coded into the code instead of put in an environment variable.
- The backend trusting the total the frontend sends instead of recalculating.
- Using GET to perform a delete that changes data.
- Joining SQL as a string instead of using a parameterized query.
- Passwords stored in plain text instead of hashed.
When you review AI-generated code, these five make a simple checklist.
AI gave you this login code:
app.post('/api/login', function(req, res) {
  const { username, password } = req.body;
  const user = db.findUser(username);
  if (user.password === password) {
    res.json({ message: '登入成功' });
  } else {
    res.status(401).json({ message: '密码错误' });
  }
});
Give yourself 1 minute to think about what is wrong with how this handles passwords, then read the answer.
看答案
Answer: the line user.password === password directly compares the user.password from the database with the plain-text password the user typed. Being able to compare like this means the user.password stored in the database is itself the plain-text password, never hashed.
The correct version uses the bcrypt from 3.D.2:
const bcrypt = require('bcrypt');

app.post('/api/login', async function(req, res) {
  const { username, password } = req.body;
  const user = db.findUser(username);
  const match = await bcrypt.compare(password, user.password);
  if (match) {
    res.json({ message: '登入成功' });
  } else {
    res.status(401).json({ message: '密码错误' });
  }
});
bcrypt.compare hashes the plain-text password the user typed the same way, then compares it against the hash stored in the database. If they match, the password is correct, and at no point does the database need to hold any plain-text password.
延伸资源
- OWASP: Password Storage Cheat Sheet — for 3.D.2, the full spec for password hashing and a comparison of algorithms
这是 Module 3 最后一个单元,把 API 设计、数据库、认证串成一个真正能跑的小后端。
3.E.1 一个后端项目通常怎么拆文件
跟 Module 2.D 前端拆成 HTML/CSS/JS 一样的道理,后端项目通常也不会把所有代码塞进一个档案:
server.js         主程式,启动服务器
routes/orders.js  订单相关的路由
routes/auth.js    注册、登入相关的路由
db.js             数据库连接设定
每个档案只负责一件事,之后要改订单逻辑,去 routes/orders.js 找就好,不用在一个几千行的档案里大海捞针。
3.E.2 中间件:处理"每个路由都要检查"的事
到目前为止的例子里,每个需要登入才能用的功能,理论上都要检查"这个人登入了吗"。但把这段检查逻辑复制贴上到每一个路由里,很快就会变得又乱又难维护。
Express 这类框架提供了中间件(middleware)来解决这个问题。中间件是夹在"请求进来"和"真正处理请求的函式"之间的一层,可以做通用的检查,检查通过才放行:
function requireAuth(req, res, next) {
  const token = req.headers.authorization;
  if (!token) {
    return res.status(401).json({ message: '请先登入' });
  }
  const user = verifyToken(token);
  if (!user) {
    return res.status(401).json({ message: 'token 无效' });
  }
  req.user = user;
  next();
}
next() 是关键:检查通过,呼叫 next() 把请求交给下一步;检查不通过,直接 return 一个错误响应,不呼叫 next(),请求就到此为止,不会继续往下跑。
用的时候,把这个函式放进路由,夹在网址和真正的处理函式中间:
app.get('/api/orders', requireAuth, function(req, res) {
  db.execute("SELECT * FROM orders WHERE user_id = ?", [req.user.id]);
});
任何需要登入才能用的路由,只要在最前面加上 requireAuth,就不用重复写检查逻辑。
3.E.3 完整范例:点餐 App 的后端
把前面几个单元学过的东西全部接起来:
const express = require('express');
const bcrypt = require('bcrypt');
const app = express();

// 注册
app.post('/api/register', async function(req, res) {
  const { username, password } = req.body;
  const hashedPassword = await bcrypt.hash(password, 10);
  db.execute(
    "INSERT INTO users (username, password) VALUES (?, ?)",
    [username, hashedPassword]
  );
  res.status(200).json({ message: '注册成功' });
});

// 登入
app.post('/api/login', async function(req, res) {
  const { username, password } = req.body;
  const results = await db.execute(
    "SELECT * FROM users WHERE username = ?",
    [username]
  );
  const user = results[0];
  if (!user) {
    return res.status(401).json({ message: '帐号或密码错误' });
  }
  const match = await bcrypt.compare(password, user.password);
  if (!match) {
    return res.status(401).json({ message: '帐号或密码错误' });
  }
  const token = generateToken(user);
  res.status(200).json({ token: token });
});

// 建立订单,需要登入
app.post('/api/orders', requireAuth, async function(req, res) {
  const items = req.body.items;
  const total = calculateTotal(items);
  await db.execute(
    "INSERT INTO orders (user_id, status, total) VALUES (?, ?, ?)",
    [req.user.id, 'pending', total]
  );
  res.status(200).json({ message: '订单已建立', total: total });
});
对照一下,这段代码符合了前面每个单元的要求:
- 密码用
bcrypt.hash存、用bcrypt.compare验证,数据库里没有明文密码(3.D) - 建立订单的路由挂了
requireAuth,没登入不能用(3.D) - 所有查询都用
?参数化,没有字串拼接(3.C) - 总价用
calculateTotal(items)后端自己算,不相信前端送来的数字(3.A) - 网址和方法符合 REST 风格,
POST /api/orders而不是POST /api/createOrder(3.B)
AI 给了你这个建立订单的路由:
app.post('/api/orders', function(req, res) {
  const items = req.body.items;
  const total = req.body.total;
  const query = "INSERT INTO orders (user_id, total) VALUES (" + req.user.id + ", " + total + ")";
  db.execute(query);
  res.status(200).json({ message: '订单已建立' });
});
这段代码里藏了三个问题,分别对应 Module 3 前面四个单元讲过的内容。给自己 3 分钟,把三个都找出来,再往下看答案。
看答案
答案:
- 没有
requireAuth:这个路由没有挂认证中间件,任何人不用登入就能建立订单,req.user根本不存在,req.user.id会直接报错。(对应 3.D) const total = req.body.total:直接信任前端送来的总价,没有自己重新计算。(对应 3.A)- 字串拼接组 SQL:
"INSERT INTO orders (user_id, total) VALUES (" + req.user.id + ", " + total + ")",把变量直接拼进 SQL 语句,有 SQL 注入风险。(对应 3.C)
改好之后就是 3.E.3 那段完整范例的写法。
Module 3 小结
后端这个模块走完了五个单元。审查后端代码时,你现在有的检查清单是:
- 请求方法和状态码用得对不对(3.A)
- API 网址符合不符合 REST 风格,有没有用 GET 执行破坏性操作(3.B)
- 数据库查询有没有用参数化,而不是字串拼接(3.C)
- 密码有没有哈希过再存,需要登入的路由有没有挂认证(3.D)
- 后端有没有自己重新计算关键数字,而不是照单全收前端送来的(3.A、3.E)
Module 4 开始讲现代技术栈:常见的框架、工具怎么组合在一起用。
This is the last unit of Module 3, tying API design, databases and auth into a small backend that actually runs.
3.E.1 How A Backend Project Is Usually Split Into Files
Just like Module 2.D split the frontend into HTML/CSS/JS, a backend project usually does not cram all the code into one file:
server.js         主程式,启动服务器
routes/orders.js  订单相关的路由
routes/auth.js    注册、登入相关的路由
db.js             数据库连接设定
Each file does one thing, so when you later change the order logic you go to routes/orders.js, instead of hunting through one file thousands of lines long.
3.E.2 Middleware: Handling "Every Route Needs This Check"
In the examples so far, every feature that requires a login should, in theory, check "is this person logged in". But copy-pasting that check into every route quickly becomes messy and hard to maintain.
Frameworks like Express provide middleware to solve this. Middleware is a layer that sits between "the request comes in" and "the function that actually handles it", where you can do a shared check and only let the request through if it passes:
function requireAuth(req, res, next) {
  const token = req.headers.authorization;
  if (!token) {
    return res.status(401).json({ message: '请先登入' });
  }
  const user = verifyToken(token);
  if (!user) {
    return res.status(401).json({ message: 'token 无效' });
  }
  req.user = user;
  next();
}
next() is the key: if the check passes, call next() to hand the request to the next step; if it fails, return an error response and do not call next(), so the request stops here and does not continue.
To use it, put the function into the route, between the URL and the real handler:
app.get('/api/orders', requireAuth, function(req, res) {
  db.execute("SELECT * FROM orders WHERE user_id = ?", [req.user.id]);
});
Any route that requires a login just adds requireAuth at the front, with no repeated check logic.
3.E.3 A Full Example: The Backend Of The Food-ordering App
Tying together everything from the earlier units:
const express = require('express');
const bcrypt = require('bcrypt');
const app = express();

// 注册
app.post('/api/register', async function(req, res) {
  const { username, password } = req.body;
  const hashedPassword = await bcrypt.hash(password, 10);
  db.execute(
    "INSERT INTO users (username, password) VALUES (?, ?)",
    [username, hashedPassword]
  );
  res.status(200).json({ message: '注册成功' });
});

// 登入
app.post('/api/login', async function(req, res) {
  const { username, password } = req.body;
  const results = await db.execute(
    "SELECT * FROM users WHERE username = ?",
    [username]
  );
  const user = results[0];
  if (!user) {
    return res.status(401).json({ message: '帐号或密码错误' });
  }
  const match = await bcrypt.compare(password, user.password);
  if (!match) {
    return res.status(401).json({ message: '帐号或密码错误' });
  }
  const token = generateToken(user);
  res.status(200).json({ token: token });
});

// 建立订单,需要登入
app.post('/api/orders', requireAuth, async function(req, res) {
  const items = req.body.items;
  const total = calculateTotal(items);
  await db.execute(
    "INSERT INTO orders (user_id, status, total) VALUES (?, ?, ?)",
    [req.user.id, 'pending', total]
  );
  res.status(200).json({ message: '订单已建立', total: total });
});
Checking through, this code meets every requirement from the earlier units:
- Passwords stored with
bcrypt.hashand verified withbcrypt.compare, no plain text in the database (3.D). - The create-order route has
requireAuth, so you cannot use it without logging in (3.D). - Every query uses
?parameters, no string joining (3.C). - The total is worked out by the backend with
calculateTotal(items), not trusting the frontend's number (3.A). - URLs and methods follow REST style,
POST /api/ordersrather thanPOST /api/createOrder(3.B).
AI gave you this create-order route:
app.post('/api/orders', function(req, res) {
  const items = req.body.items;
  const total = req.body.total;
  const query = "INSERT INTO orders (user_id, total) VALUES (" + req.user.id + ", " + total + ")";
  db.execute(query);
  res.status(200).json({ message: '订单已建立' });
});
This code hides three problems, each matching one of the earlier four units of Module 3. Give yourself 3 minutes to find all three, then read the answer.
看答案
Answer:
- No
requireAuth: this route has no auth middleware, so anyone can create an order without logging in,req.userdoes not exist, andreq.user.idthrows. (matches 3.D) const total = req.body.total: it trusts the total the frontend sent, without recalculating. (matches 3.A)- String-joined SQL:
"INSERT INTO orders (user_id, total) VALUES (" + req.user.id + ", " + total + ")"joins variables straight into the SQL, so there is a SQL injection risk. (matches 3.C)
Fixed, it becomes the full example in 3.E.3.
Module 3 Recap
The backend module walked through five units. The checklist you now have for reviewing backend code:
- Are the request method and status code used correctly (3.A)?
- Does the API URL follow REST style, and is GET ever used for a destructive action (3.B)?
- Do database queries use parameters instead of string joining (3.C)?
- Are passwords hashed before storing, and do login-only routes have auth (3.D)?
- Does the backend recalculate the key numbers itself, instead of taking the frontend's at face value (3.A, 3.E)?
Module 4 starts on the modern tech stack: how common frameworks and tools combine.
延伸资源
- Express.js: Routing guide — 对应 3.E.1、3.E.2,路由和中间件的完整官方说明— for 3.E.1 and 3.E.2, the official guide to routes and middleware