2.A.1 HTML 不是"写程序",是"贴标签"
HTML 全名 HyperText Markup Language,markup 是标记的意思。它不是编程语言,没有逻辑判断、没有计算,纯粹是给内容贴标签,告诉浏览器"这段是标题"、"这段是段落"、"这里有张图片"。
一个最小的 HTML 文件长这样:
<!DOCTYPE html>
<html>
  <head>
    <title>我的第一个网页</title>
  </head>
  <body>
    <h1>欢迎</h1>
    <p>这是一段文字。</p>
  </body>
</html>
逐行看:
<!DOCTYPE html>:告诉浏览器"这是一份现代 HTML 文件",永远放在第一行。<html>...</html>:包住整份文件的最外层容器。<head>...</head>:放网页的资讯,像标题、要用哪个 CSS 档,这些东西不会显示在页面上。<body>...</body>:放实际会显示出来的内容。<h1>、<p>:body 里面具体的内容标签,一个是标题,一个是段落。
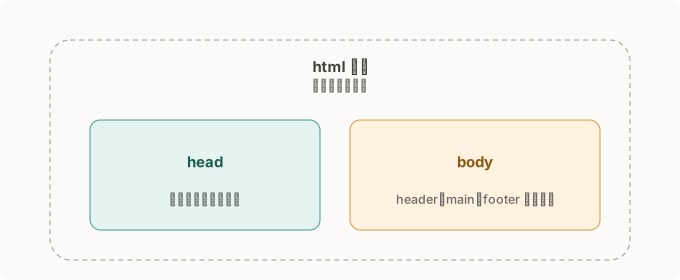
标签通常成对出现,像括号:<p> 是开始标签,</p> 是结束标签,内容包在中间。标签可以互相包着,形成一层一层的结构,这叫嵌套。上面那张图画的就是这个嵌套关系。
2.A.2 常用标签,先认得这十几个
文字类
<h1>到<h6>:标题,数字越小字越大,<h1>是页面最重要的标题,通常一个页面只用一次<p>:段落<a>:超链接,用href属性指定要连去哪<strong>:语气加重,浏览器默认显示加粗<em>:强调,浏览器默认显示斜体
容器类
<div>:没有语义的万用容器,通常用来包一堆东西方便套样式或抓取<span>:跟 div 一样没有语义,但是行内的,通常包一小段文字
列表类
<ul>:无序列表(项目符号)<ol>:有序列表(数字编号)<li>:列表项目,一定放在<ul>或<ol>里面
互动类
<button>:按钮<input>:输入框,常见于表单<form>:表单,包住一堆 input,用来送出资料
媒体类
<img>:图片,用src指定图片位置,alt写图片说明,会影响无障碍和 SEO
2.A.3 属性:给标签补充资讯
标签可以带属性,语法是 <标签 属性名="值">。常见的几个:
id:给某个元素一个独一无二的名字,方便之后用 CSS 或 JavaScript 精准抓到它class:给元素贴标签,方便群组套用样式。一个元素可以有多个 class,很多元素也可以共用同一个 classsrc:图片、影片等资源的位置href:链接要去的地方alt:图片的文字说明,画面读不出来时显示,屏幕阅读器也会念出来
举例:<img src="cat.jpg" alt="一只橘猫" class="thumbnail">,这张图片来自 cat.jpg,说明是"一只橘猫",套用了叫 thumbnail 的样式。
2.A.4 语义化标签:为什么不要全部都用 div
div 没有语义,浏览器不知道它是什么角色。HTML5 提供了一批语义化标签:<header>、<nav>、<main>、<footer>、<section>、<article>,各自代表明确的角色。
不好的写法:
<div class="header">
  <div class="nav">...</div>
</div>
<div class="main-content">...</div>
<div class="footer">...</div>
更好的写法:
<header>
  <nav>...</nav>
</header>
<main>...</main>
<footer>...</footer>
画面上看起来可能一模一样,但语义化版本更容易被屏幕阅读器理解、更容易做 SEO,也更容易让你自己之后回来看懂结构。
AI 生成代码时,图方便常常整篇都用 div,你审查时要留意这点。
这是 AI 写的一个"送出订单"按钮:
<div onclick="submitForm()">送出订单</div>
给自己 1 分钟,想想这样写有什么问题,再往下看。
看答案
答案:这应该用 <button>,不该用 <div>。
<div> 本身没有"可以被点击"的语义。用键盘操作的人按 Tab 键没办法选到它,屏幕阅读器也不会念出"这是一个按钮",使用者得靠鼠标才能操作。<button> 天生就具备这些能力,不用额外处理。
正确写法:
<button onclick="submitForm()">送出订单</button>
这种"用 div 冒充按钮"的问题,在 AI 生成的前端代码里很常见,因为功能上两者看起来都能点、都能跑,但可用性天差地远。
延伸资源
- MDN: Structuring content with HTML — 完整的 HTML 结构入门,涵盖这一节讲的所有内容
- MDN: HTML 元素总览 — 需要查某个标签的用法时来这里
- MDN: Semantics glossary — 对应 2.A.4,讲清楚语义化到底在解决什么问题
2.A.1 HTML Is Not "Writing A Program", It Is "Tagging Content"
HTML stands for HyperText Markup Language, and markup means labeling. It is not a programming language. It has no logic and no calculation. It simply tags content, telling the browser "this part is a heading", "this part is a paragraph", "there is an image here".
The smallest HTML file looks like this:
<!DOCTYPE html>
<html>
  <head>
    <title>我的第一个网页</title>
  </head>
  <body>
    <h1>欢迎</h1>
    <p>这是一段文字。</p>
  </body>
</html>
Line by line:
<!DOCTYPE html>: tells the browser "this is a modern HTML file". It always goes on the first line.<html>...</html>: the outermost container that wraps the whole file.<head>...</head>: holds information about the page, like the title and which CSS file to use. None of this shows on the page itself.<body>...</body>: holds the content that actually shows up.<h1>and<p>: the actual content tags inside body, one a heading and one a paragraph.
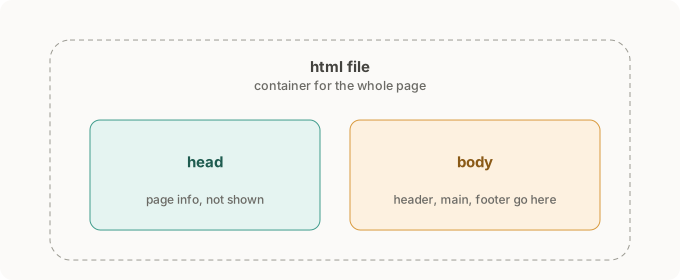
Tags usually come in pairs, like brackets: <p> is the opening tag, </p> is the closing tag, and the content sits between them. Tags can wrap each other, forming a layered structure. This is called nesting, and the diagram above shows exactly that relationship.
2.A.2 Common Tags: Get To Know This Dozen Or So First
Text
<h1>to<h6>: headings. The smaller the number, the larger the text.<h1>is the most important heading on the page and is usually used only once.<p>: a paragraph.<a>: a hyperlink, using thehrefattribute to say where it goes.<strong>: strong importance, shown bold by default.<em>: emphasis, shown italic by default.
Containers
<div>: a general-purpose container with no meaning, usually used to wrap a group of things for styling or selecting.<span>: like div, with no meaning, but inline, usually wrapping a short piece of text.
Lists
<ul>: an unordered list (bullet points).<ol>: an ordered list (numbered).<li>: a list item, which must sit inside a<ul>or<ol>.
Interactive
<button>: a button.<input>: an input field, common in forms.<form>: a form that wraps a set of inputs and submits data.
Media
<img>: an image, usingsrcfor the image location andaltfor a description, which affects accessibility and SEO.
2.A.3 Attributes: Extra Information On A Tag
Tags can carry attributes, written as <tag name="value">. A few common ones:
id: gives an element a unique name, so you can target it precisely later with CSS or JavaScript.class: labels an element so you can style a group at once. An element can have several classes, and many elements can share one class.src: the location of a resource like an image or video.href: where a link goes.alt: a text description of an image, shown when the image cannot load, and read aloud by screen readers.
For example, <img src="cat.jpg" alt="an orange cat" class="thumbnail">: this image comes from cat.jpg, is described as "an orange cat", and uses a style called thumbnail.
2.A.4 Semantic Tags: Why You Should Not Use Div For Everything
A div has no meaning, so the browser does not know what role it plays. HTML5 offers a set of semantic tags: <header>, <nav>, <main>, <footer>, <section>, <article>, each with a clear role.
The weaker way:
<div class="header">
  <div class="nav">...</div>
</div>
<div class="main-content">...</div>
<div class="footer">...</div>
The better way:
<header>
  <nav>...</nav>
</header>
<main>...</main>
<footer>...</footer>
On screen they may look identical, but the semantic version is easier for screen readers to understand, easier for SEO, and easier for you to make sense of when you come back to it later.
When AI generates code it often uses div for everything to save effort, so watch for this when you review.
Here is a "Place order" button written by AI:
<div onclick="submitForm()">送出订单</div>
Give yourself 1 minute to think about what is wrong here, then read on.
看答案
Answer: this should use <button>, not <div>.
A <div> has no "clickable" meaning of its own. Someone using a keyboard cannot reach it with the Tab key, a screen reader will not announce "this is a button", and the user can only operate it with a mouse. A <button> has all of this built in, with no extra work.
The correct version:
<button onclick="submitForm()">送出订单</button>
This "a div pretending to be a button" problem is very common in AI-generated frontend code, because functionally both look clickable and both run, but their usability is worlds apart.
延伸资源
- MDN: Structuring content with HTML — a full intro to HTML structure, covering everything in this unit
- MDN: HTML elements reference — come here to look up how any tag works
- MDN: Semantics glossary — for 2.A.4, spelling out what semantic markup actually solves
2.B.1 CSS 在解决什么问题
HTML 负责内容和结构,CSS 负责外观:颜色、大小、间距、排版。
把两者分开的好处是,同一份 HTML,换一份 CSS,就能变成完全不同的风格,不用碰内容本身。这也是为什么审查 AI 生成的前端代码时,你要分开看:结构对不对是 HTML 的问题,长得好不好看是 CSS 的问题,两者出错的原因完全不同。
2.B.2 CSS 语法:选择器 + 属性
CSS 规则长这样:
p {
  color: blue;
  font-size: 16px;
}
p 是选择器,决定这条规则套用在哪些元素上。大括号里面是声明,color: blue 是一组属性和值。
三种最基本的选择器:
- 元素选择器:
p { },选中所有<p>标签 - class 选择器:
.thumbnail { },选中所有class="thumbnail"的元素,前面要加一个点 - id 选择器:
#header { },选中id="header"的那一个元素,前面要加井号
优先级简单记:id 比 class 精准,class 比元素选择器精准。两条规则如果冲突,精准的那条赢;精准度一样,后写的规则赢。这是 AI 生成的 CSS 常出问题的地方:样式改了没生效,往往是因为有另一条优先级更高的规则在别处覆盖了它。
2.B.3 盒模型:每个元素都是一个盒子
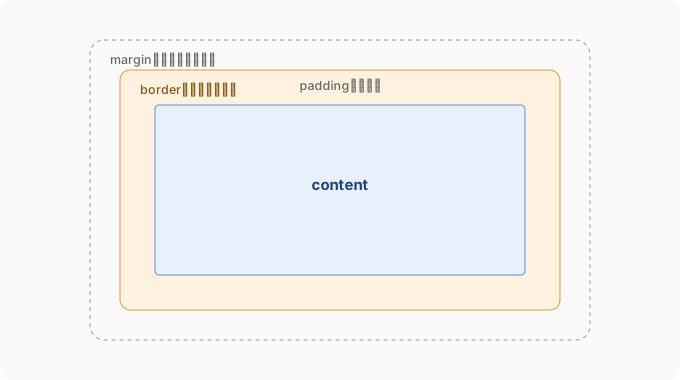
上面这张图是这一节的核心。CSS 里每个元素都被当成一个矩形盒子,由内而外分四层:
- content:实际的内容,文字或图片
- padding:内容跟边框之间的留白
- border:看得见的边框
- margin:边框跟外面其他元素之间的间距,看不见
这四层直接决定一个元素实际占多少空间。默认情况下,width 只算 content 的宽度,padding 和 border 是额外加上去的。这个默认行为是很多排版 bug 的根源,下面的动手练习会具体拆一个。
2.B.4 排版:Flexbox 基础
现代网页排版基本都用 flexbox 或 grid,很少再用旧式的 float。flexbox 处理一维排版:一排东西要横着排还是竖着排、要怎么对齐。
.container {
  display: flex;
  justify-content: space-between;
  align-items: center;
}
display: flex:让这个容器里的直接子元素变成"弹性项目",开始横向排列justify-content:控制主轴方向(默认横向)怎么分配空间,space-between是让项目两端对齐、间距平均分配align-items:控制交叉轴方向(默认纵向)怎么对齐,center是让项目垂直置中
看到 AI 生成的 CSS 里出现 display: flex,先看它有没有搭配 justify-content 或 align-items,这两个属性通常是排版这一段的关键。
2.B.5 响应式设计基础
手机屏幕跟电脑屏幕宽度差很多,同一份网页要能在两边都好看,靠的是媒体查询:
@media (max-width: 600px) {
  .container {
    flex-direction: column;
  }
}
意思是:当屏幕宽度小于等于 600px 时,套用大括号里的规则。这里让原本横向排列的容器改成纵向排列,很典型的手机版排版调整。
AI 给了你这段代码,用来做一张卡片:
.card {
  width: 100%;
  padding: 20px;
  border: 1px solid #ccc;
}
假设这张卡片的父容器宽度是 300px,给自己 1 分钟,算算这张卡片实际会占多宽,再往下看答案。
看答案
答案:这张卡片实际占 342px,超出父容器整整 42px。
按默认的盒模型,width: 100% 只算 content 的宽度,等于父容器的 300px。padding 20px 是左右各加 20px,等于多了 40px。border 1px 是左右各加 1px,等于多了 2px。300 + 40 + 2 = 342px。
这张卡片会溢出父容器,画面上可能会看到卡片超出边界,或者出现不该出现的横向卷轴。
正确写法是加一行:
.card {
  box-sizing: border-box;
  width: 100%;
  padding: 20px;
  border: 1px solid #ccc;
}
box-sizing: border-box 会让 padding 和 border 都算在 width 以内,卡片实际宽度就真的是 300px。这是 CSS 里最常见的新手坑之一,AI 生成代码时也常常漏加这行。
延伸资源
- MDN: Getting started with CSS — 对应 2.B.1、2.B.2,CSS 语法和三种基本选择器
- MDN: The box model — 对应 2.B.3,把盒模型讲得更细
- MDN: Flexbox — 对应 2.B.4,完整的 flexbox 教学
2.B.1 What CSS Solves
HTML handles content and structure. CSS handles appearance: color, size, spacing and layout.
The benefit of keeping them separate is that the same HTML with a different CSS becomes a completely different look, without touching the content. This is also why, when you review AI-generated frontend code, you look at them separately: whether the structure is right is an HTML question, whether it looks good is a CSS question, and the two go wrong for entirely different reasons.
2.B.2 CSS Syntax: Selector Plus Properties
A CSS rule looks like this:
p {
  color: blue;
  font-size: 16px;
}
p is the selector, which decides which elements the rule applies to. Inside the braces are declarations, and color: blue is one property and value.
The three most basic selectors:
- Element selector:
p { }, selects every<p>tag. - Class selector:
.thumbnail { }, selects every element withclass="thumbnail", written with a leading dot. - ID selector:
#header { }, selects the one element withid="header", written with a leading hash.
Priority in short: id is more specific than class, class is more specific than an element selector. If two rules conflict, the more specific one wins; if they are equally specific, the one written later wins. This is where AI-generated CSS often trips up: a style change that has no effect is usually because a higher-priority rule somewhere else is overriding it.
2.B.3 The Box Model: Every Element Is A Box
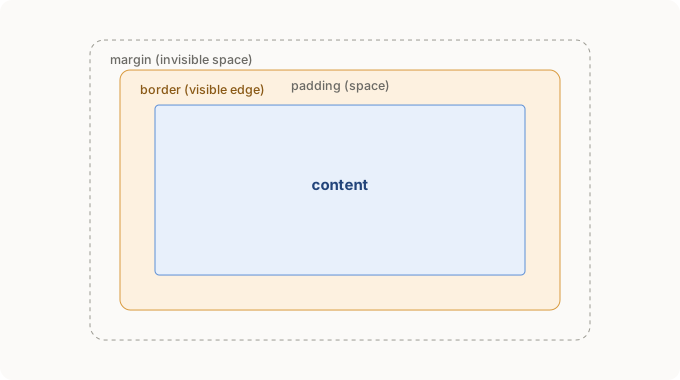
The diagram above is the heart of this unit. In CSS every element is treated as a rectangular box, with four layers from the inside out:
- content: the actual content, text or an image.
- padding: the space between the content and the border.
- border: the visible border.
- margin: the invisible space between the border and other elements around it.
These four layers decide how much space an element actually takes. By default, width only counts the content, and padding and border are added on top. This default is the source of many layout bugs, and the exercise below unpacks one.
2.B.4 Layout: Flexbox Basics
Modern web layout mostly uses flexbox or grid, rarely the old-style float. Flexbox handles one-dimensional layout: whether a row of things sits horizontally or vertically, and how it aligns.
.container {
  display: flex;
  justify-content: space-between;
  align-items: center;
}
display: flex: turns the direct children of this container into "flex items" and starts laying them out in a row.justify-content: controls how space is shared along the main axis (horizontal by default).space-betweenpushes items to both ends and spreads the gaps evenly.align-items: controls alignment on the cross axis (vertical by default).centercenters the items vertically.
When you see display: flex in AI-generated CSS, first check whether it is paired with justify-content or align-items. Those two are usually the key to the layout.
2.B.5 Responsive Design Basics
Phone screens and computer screens differ a lot in width. For the same page to look good on both, you use a media query:
@media (max-width: 600px) {
  .container {
    flex-direction: column;
  }
}
It means: when the screen width is 600px or less, apply the rules inside the braces. Here it switches a container that was laid out horizontally to vertical, a very typical mobile layout adjustment.
AI gave you this code for a card:
.card {
  width: 100%;
  padding: 20px;
  border: 1px solid #ccc;
}
Say the card's parent container is 300px wide. Give yourself 1 minute to work out how wide the card actually is, then read the answer.
看答案
Answer: the card actually takes 342px, a full 42px past its parent.
With the default box model, width: 100% only counts the content, which equals the parent's 300px. The padding of 20px adds 20px on each side, so 40px more. The border of 1px adds 1px on each side, so 2px more. 300 + 40 + 2 = 342px.
The card overflows its parent, so you may see it spill past the edge, or an unwanted horizontal scrollbar appear.
The fix is one line:
.card {
  box-sizing: border-box;
  width: 100%;
  padding: 20px;
  border: 1px solid #ccc;
}
box-sizing: border-box makes padding and border count inside width, so the card really is 300px. This is one of the most common beginner traps in CSS, and AI often forgets this line too.
延伸资源
- MDN: Getting started with CSS — for 2.B.1 and 2.B.2, CSS syntax and the three basic selectors
- MDN: The box model — for 2.B.3, the box model in more detail
- MDN: Flexbox — for 2.B.4, a full flexbox tutorial
2.C.1 JavaScript 在解决什么问题
HTML 给内容结构,CSS 给外观,JavaScript 给行为。没有 JavaScript,网页是静态的:按钮按了没反应,画面不会跟着资料变化,一切都得靠重新载入整个页面才能更新。
JavaScript 让网页能回应使用者的动作、能在不重新载入页面的情况下改变画面、能做计算和逻辑判断。前面两个模块讲的骨架和皮肤,这个模块开始会真正动起来。
2.C.2 基本语法:变量、函式、条件判断
变量:用来存资料的容器。
let quantity = 1;
const taxRate = 0.06;
let 声明的变量之后可以改值,const 声明的之后不能重新赋值。没有特别理由要改值的话,优先用 const,这样如果之后不小心改到它,程序会直接报错提醒你,而不是默默产生错误结果。
函式:一段可以重复使用的代码。
function calculateTotal(price, quantity) {
  return price * quantity;
}
calculateTotal 是函式名字,price 和 quantity 是参数,函式内部用这两个参数算出结果,用 return 把结果传出去。要用这个函式时,写 calculateTotal(50, 3),会得到 150。
条件判断:让程序根据不同情况执行不同代码。
if (quantity > 0) {
  console.log("有效数量");
} else {
  console.log("数量不能是 0 或负数");
}
2.C.3 DOM:JavaScript 怎么"看到"网页
浏览器会把 HTML 转成一份 JavaScript 可以读取、修改的树状结构,叫 DOM(Document Object Model)。Module 2.A 讲的 HTML 嵌套结构图,就是 DOM 的雏形。
JavaScript 要操作网页,第一步永远是先抓到想要的元素:
const button = document.querySelector('.checkout-btn');
const display = document.getElementById('total');
querySelector 用 CSS 选择器的语法找元素,getElementById 专门用 id 找。抓到元素之后,可以读它、改它:
display.textContent = "总价:150 元";
display.style.color = "red";
textContent 改文字内容,style 改样式。这两行会让画面上真的显示新文字、变成红色,不需要重新载入页面。
2.C.4 事件:让页面对使用者的动作有反应
光抓到元素还不够,你需要告诉浏览器"当使用者做某个动作时,执行这段代码",这靠事件监听器:
button.addEventListener('click', function() {
  console.log('按钮被点击了');
});
addEventListener 的第一个参数是事件类型(click 是点击,input 是输入框内容改变,submit 是表单送出),第二个参数是事件发生时要执行的函式。
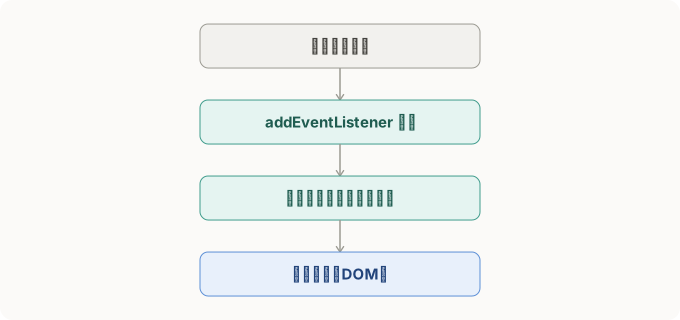
上面那张图画的就是这个流程:使用者点击 → addEventListener 侦测到 → 执行函式做计算 → 更新 DOM 让画面跟着变。这四步是几乎所有网页互动功能的骨架,接下来你看到的任何"点了按钮画面就变"的功能,拆开来都是这四步。
AI 给你一个"加一"按钮的逻辑,用来增加购买数量:
button.addEventListener('click', function() {
  let quantity = input.value;
  let newQuantity = quantity + 1;
  display.textContent = newQuantity;
});
假设使用者在输入框打了 2,点一下按钮。给自己 1 分钟,想想画面上最后会显示什么,再往下看答案。
看答案
答案:画面会显示 21,不是 3。
input.value 从输入框读到的永远是字串(string),就算使用者打的是数字。字串 "2" 加上数字 1,JavaScript 会把 1 也当成字串处理,做的是字串串接,不是数学加法,"2" + 1 变成 "21"。
正确写法要先把字串转成数字:
button.addEventListener('click', function() {
  let quantity = Number(input.value);
  let newQuantity = quantity + 1;
  display.textContent = newQuantity;
});
Number() 把字串转成数字,"2" 变成 2,这时候 2 + 1 才会得到正确的 3。
这种"忘记转型态"的问题,在 AI 生成的 JavaScript 里非常常见,因为代码本身完全没有语法错误,能跑,只是算出来的结果是错的,不细看很容易漏掉。
延伸资源
- MDN: A first splash into JavaScript — 对应 2.C.2,用一个实际小项目带你看变量、函式怎么配合运作
- MDN: DOM scripting introduction — 对应 2.C.3,把 DOM 的概念和操作方式讲得更细
- MDN: Introduction to events — 对应 2.C.4,事件监听器完整教学
2.C.1 What JavaScript Solves
HTML gives content structure, CSS gives appearance, JavaScript gives behavior. Without JavaScript a page is static: a button does nothing when pressed, the screen does not change with the data, and everything only updates by reloading the whole page.
JavaScript lets a page respond to what the user does, change the screen without a reload, and run calculations and logic. The skeleton and skin from the last two units start to actually move in this one.
2.C.2 Basic Syntax: Variables, Functions, Conditionals
Variables: containers that hold data.
let quantity = 1;
const taxRate = 0.06;
A variable declared with let can be reassigned later; one declared with const cannot. Unless you have a reason to reassign, prefer const, so that if you accidentally change it later the program errors out and warns you, instead of quietly producing a wrong result.
Functions: a reusable piece of code.
function calculateTotal(price, quantity) {
  return price * quantity;
}
calculateTotal is the function name, price and quantity are the parameters, the function uses them to work out a result, and return passes the result back out. To use it, you write calculateTotal(50, 3), which gives 150.
Conditionals: let the program run different code for different situations.
if (quantity > 0) {
  console.log("有效数量");
} else {
  console.log("数量不能是 0 或负数");
}
2.C.3 The DOM: How JavaScript "Sees" A Page
The browser turns HTML into a tree structure that JavaScript can read and change, called the DOM (Document Object Model). The HTML nesting diagram from Module 2.A is the seed of the DOM.
For JavaScript to work on a page, the first step is always to grab the element you want:
const button = document.querySelector('.checkout-btn');
const display = document.getElementById('total');
querySelector finds an element using CSS selector syntax; getElementById finds one by id. Once you have the element, you can read it and change it:
display.textContent = "总价:150 元";
display.style.color = "red";
textContent changes the text, style changes the styling. These two lines make the screen actually show new text and turn red, with no page reload.
2.C.4 Events: Making A Page Respond To The User
Grabbing an element is not enough. You need to tell the browser "when the user does this action, run this code", using an event listener:
button.addEventListener('click', function() {
  console.log('按钮被点击了');
});
The first argument to addEventListener is the event type (click for a click, input for a change in a field, submit for a form submission), and the second is the function to run when it happens.
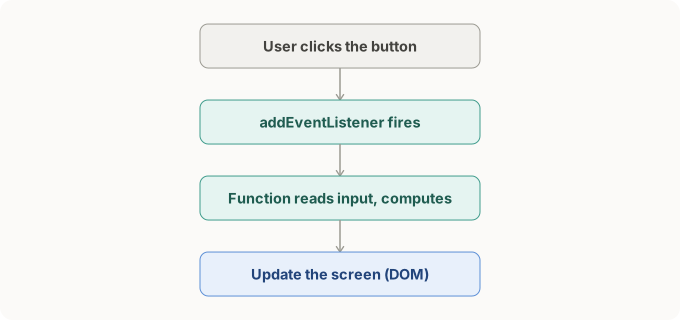
The diagram above shows this flow: the user clicks, addEventListener detects it, the function runs a calculation, and the DOM updates so the screen changes. These four steps are the skeleton of almost every interactive feature on the web. Any "click the button and the screen changes" behavior you meet from now on unpacks into these same four steps.
AI gives you the logic for a "plus one" button that increases the quantity:
button.addEventListener('click', function() {
  let quantity = input.value;
  let newQuantity = quantity + 1;
  display.textContent = newQuantity;
});
Say the user typed 2 in the field and clicks once. Give yourself 1 minute to work out what the screen shows, then read the answer.
看答案
Answer: the screen shows 21, not 3.
input.value always reads a string from a field, even when the user typed a number. The string "2" plus the number 1 makes JavaScript treat 1 as a string too, so it joins strings instead of adding numbers, and "2" + 1 becomes "21".
The fix is to convert the string to a number first:
button.addEventListener('click', function() {
  let quantity = Number(input.value);
  let newQuantity = quantity + 1;
  display.textContent = newQuantity;
});
Number() turns the string into a number, "2" becomes 2, and now 2 + 1 gives the correct 3.
This "forgot to convert the type" problem is very common in AI-generated JavaScript, because the code has no syntax error at all and runs fine, it just produces the wrong result, which is easy to miss unless you look closely.
延伸资源
- MDN: A first splash into JavaScript — for 2.C.2, a small real project showing how variables and functions work together
- MDN: DOM scripting introduction — for 2.C.3, the DOM idea and how to work with it in more detail
- MDN: Introduction to events — for 2.C.4, a full tutorial on event listeners
这一节把前三个单元学过的 HTML、CSS、JavaScript 接起来,做一个真正能跑的小点餐工具,同时拆开讲清楚这三个档案是怎么串起来、又是靠什么互相认出对方的。
2.D.1 三个档案怎么串起来
实际项目通常不会把 HTML、CSS、JS 全写在同一个档案里,而是拆成三个档案:index.html、style.css、script.js。
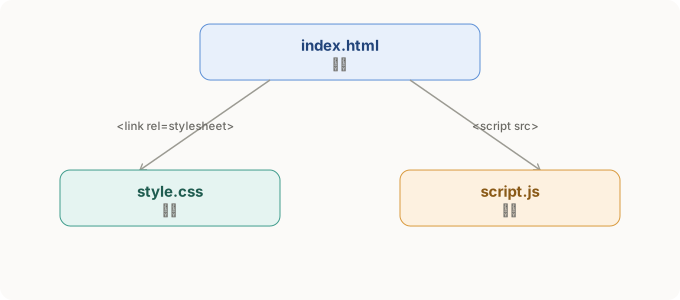
串起来靠两行:
<head>
  <link rel="stylesheet" href="style.css">
</head>
<body>
  ...
  <script src="script.js"></script>
</body>
<link rel="stylesheet" href="style.css"> 放在 <head> 里,把 CSS 档接进来。<script src="script.js"></script> 放在 </body> 结束标签之前,而不是放在 <head> 里。
这个位置是刻意的。script 标签如果放在 head,浏览器读到它的时候,body 里的元素都还没被建出来,这时候如果 JS 想抓某个元素,会抓到 null。放在 body 最后,浏览器读到 script 之前,前面所有的 HTML 元素都已经存在了,JS 才抓得到。这是审查 AI 生成的 HTML 时值得留意的一个细节:script 标签的位置不对,会是很多"抓不到元素"错误的根源。
2.D.2 完整范例:一个小点餐工具
这是这三个档案实际跑起来的样子,可以先玩玩看:点「加入」把商品加进购物车,总价会跟着变,按「送出订单」会看到确认讯息。
This unit connects the HTML, CSS and JavaScript from the first three units into a small food-ordering tool that actually runs, and pulls apart how the three files link together and how they recognize each other.
2.D.1 How The Three Files Link Together
A real project usually does not put HTML, CSS and JS in one file. It splits them into three: index.html, style.css, script.js.
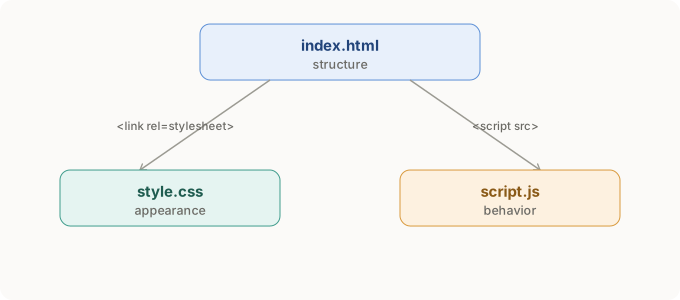
Two lines tie them together:
<head>
  <link rel="stylesheet" href="style.css">
</head>
<body>
  ...
  <script src="script.js"></script>
</body>
<link rel="stylesheet" href="style.css"> goes in the <head> and pulls the CSS file in. <script src="script.js"></script> goes just before the closing </body> tag, not in the <head>.
That position is deliberate. If the script tag sits in the head, then when the browser reads it none of the elements in the body exist yet, so if the JS tries to grab an element it gets null. Placed at the end of the body, all the HTML elements already exist by the time the browser reaches the script, so the JS can find them. This is a detail worth watching when you review AI-generated HTML: a script tag in the wrong place is the source of many "cannot find the element" errors.
2.D.2 A Full Example: A Small Food-ordering Tool
Here is what these three files look like running. Try it: tap "Add" to put an item in the cart and the total changes, and tap "Place order" to see a confirmation message.
Today's Menu
Cart
Total: RM 0
下面是产生这个小工具的完整原始码。
index.html
Below is the full source code that produces this tool.
index.html
<!DOCTYPE html>
<html>
<head>
  <meta charset="UTF-8">
  <title>小吃点餐</title>
  <link rel="stylesheet" href="style.css">
</head>
<body>
  <div class="menu">
    <h1>今日菜单</h1>
    <div class="item">
      <span class="item-name">炒饭</span>
      <span class="item-price">RM 8</span>
      <button class="btn-add" data-name="炒饭" data-price="8">加入</button>
    </div>
    <div class="item">
      <span class="item-name">奶茶</span>
      <span class="item-price">RM 4</span>
      <button class="btn-add" data-name="奶茶" data-price="4">加入</button>
    </div>
  </div>
  <div class="cart">
    <h2>购物车</h2>
    <ul id="cart-list"></ul>
    <p>总价:RM <span id="total-price">0</span></p>
    <button id="checkout-btn">送出订单</button>
  </div>
  <script src="script.js"></script>
</body>
</html>
style.css
.item {
  display: flex;
  justify-content: space-between;
  align-items: center;
  padding: 10px 0;
  border-bottom: 1px solid #eee;
}
.btn-add, #checkout-btn {
  background: #2d8f5f;
  color: white;
  border: none;
  padding: 6px 12px;
  border-radius: 6px;
  cursor: pointer;
}
script.js
let total = 0;
const cartList = document.getElementById('cart-list');
const totalDisplay = document.getElementById('total-price');
const addButtons = document.querySelectorAll('.btn-add');

addButtons.forEach(function(button) {
  button.addEventListener('click', function() {
    const name = button.dataset.name;
    const price = Number(button.dataset.price);

    total += price;
    totalDisplay.textContent = total;

    const li = document.createElement('li');
    li.textContent = name + ' - RM ' + price;
    cartList.appendChild(li);
  });
});

document.getElementById('checkout-btn').addEventListener('click', function() {
  alert('订单已送出,总价 RM ' + total);
});
三个档案之间靠命名互相认出对方:
class="btn-add"在 HTML 里标记按钮,CSS 用.btn-add抓去套样式,JS 用document.querySelectorAll('.btn-add')抓去接事件。同一个名字,三边都要对得上。id="cart-list"、id="total-price"也是同样的道理,只是 id 通常给 JS 用来抓单一元素。data-name、data-price是自定义属性,HTML 用它们把资料"贴"在按钮上,JS 用button.dataset.name、button.dataset.price把资料读出来。这是常见的"资料放哪"的解法:不用另外维护一份对照表,资料就跟着元素本身走。
AI 帮你把 script.js 稍微改了一下,想加个功能,但没注意到一个地方:
const totalDisplay = document.getElementById('totalPrice');
HTML 里那个显示总价的元素还是原本的 id="total-price"。给自己 1 分钟,想想执行结果会怎样,再往下看答案。
看答案
答案:totalDisplay 会是 null,因为 getElementById('totalPrice') 找的是 totalPrice(驼峰式),但 HTML 里实际的 id 是 total-price(连字符式),两个名字不一样,找不到对应元素。
之后只要有代码想改 totalDisplay.textContent,就会报错:Cannot set properties of null。整个购物车功能会直接坏掉,而且错误讯息不会明讲"是 id 拼错了",你得自己往回追。
这类 bug 很常见的原因是,JavaScript 社群习惯用驼峰式命名(totalPrice),HTML/CSS 社群习惯用连字符式命名(total-price),AI 生成代码时有时会在两种习惯之间切换不一致。审查代码时,跨档案用到的名字,一定要逐字比对,不能只扫过去覚得"看起来差不多"。
Module 2 小结
前端这个模块走完了四个单元:HTML 给结构、CSS 给外观、JavaScript 给行为、这一节把三者串起来。
审查前端代码时,你现在有的检查清单是:
- 结构对不对:标签用得语义化吗,还是整篇都是 div
- 外观算得对不对:有没有漏 box-sizing,选择器优先级有没有搞错
- 行为读的资料型态对不对:字串跟数字有没有搞混
- 三者之间的名字对不对:class、id、data 属性有没有跨档案对齐
Module 3 开始讲后端:网页的大脑,这四点会延伸到"资料到底存在哪里、又是怎么被处理的"。
The three files recognize each other by shared names:
class="btn-add"marks the button in HTML, CSS grabs it with.btn-addto style it, and JS grabs it withdocument.querySelectorAll('.btn-add')to attach the event. The same name has to line up across all three.id="cart-list"andid="total-price"work the same way, except an id is usually used by JS to grab a single element.data-nameanddata-priceare custom attributes. HTML uses them to "stick" data onto the button, and JS reads it back withbutton.dataset.nameandbutton.dataset.price. This is a common answer to "where does the data live": you do not maintain a separate lookup table, the data travels with the element itself.
AI tweaked your script.js to add a feature, but missed one thing:
const totalDisplay = document.getElementById('totalPrice');
The element that shows the total in the HTML is still the original id="total-price". Give yourself 1 minute to think about what happens, then read the answer.
看答案
Answer: totalDisplay will be null, because getElementById('totalPrice') looks for totalPrice (camelCase), but the actual id in the HTML is total-price (hyphenated). The two names differ, so no element is found.
After that, any code that tries to change totalDisplay.textContent will throw Cannot set properties of null. The whole cart feature breaks, and the error message does not spell out "the id is misspelled", so you have to trace it back yourself.
A common cause of this bug is that the JavaScript world tends to use camelCase (totalPrice) while the HTML and CSS world tends to use hyphenated names (total-price), and AI sometimes switches between the two inconsistently. When you review, compare cross-file names character by character. Do not just glance over them and decide they "look about the same".
Module 2 Recap
The frontend module walked through four units: HTML gives structure, CSS gives appearance, JavaScript gives behavior, and this unit ties the three together.
The checklist you now have for reviewing frontend code:
- Is the structure right: are tags used semantically, or is it all divs?
- Is the sizing right: is box-sizing missing, is selector priority mixed up?
- Is the data type in the behavior right: are strings and numbers confused?
- Do the names line up: are class, id and data attributes aligned across files?
Module 3 starts on the backend, the brain of the page, where these four points extend into "where the data actually lives, and how it gets processed".
延伸资源
- MDN: JavaScript: Adding interactivity — 一个从零开始、把 HTML/CSS/JS 串起来做出真实小网站的教学,跟这一节的示范是同一个套路— a from-scratch tutorial that ties HTML, CSS and JS into a real small site, the same pattern as this unit's demo